Ted's No.1 Woodworking Resource

Ted's No.1 Woodworking Resource
Download 16,000 Amazing Woodworking Plans Today!

Monday, 14 March 2016

Wood Finishes - A General Overview!

Wood finishes are generally referred to as clear, transparent coatings applied to wood, to prevent moisture ingress and and to enhance it's appearance.

A wood finish is different to paint which contains a colour pigment that will hide the grain. It also differs from a wood stain which is effectively a colouring medium with thinner added that can be wiped off.

Application Of Brush Applied Wood Stain Finish

However, the word 'finish' can be confusing because it's a generic term that is often applied to all types of finish. This is why terms like lacquer finish, paint finish and wood stain finish are used, as they are more descriptive.

If finishes are used as protection, it means they protect the wood against moisture, which can warp the wood, as well as from unsightly finger marks. Generally, the thicker the finish, the better the protection.

Decorative finishes give wood a richer and deeper quality that lots of people find more appealing. The visual impact however, is more pronounced on stained darker woods.

When applying a finish, the first coat is used to seal the wood. This raises the grain and makes it feel rougher. When dry, the surface of the wood should then be lightly sanded by hand until smooth.

Where there are irregularities such as knots, they can be 'stopped off' to reduce their overall impact, using a proprietary knotting solution.

Some finishes like wood stains can be applied by brush, or cloth because they can be easily wiped off. Other finishes can be applied by spraying but more care is needed as spray guns need to be properly maintained to provide a high quality finish.

When the appearance is adversely affected by brush marks, runs and fatty edges, these can be easily rectified by sanding off and re-applying the finishing coat!

Monday, 7 March 2016

Wood Carving For Beginners!

Polmac (UK) Ltd has been using hand carving techniques, as well as other techniques, to embellish our decorated wood boxes for many years.

There is real craftsmanship involved in hand carving complex patterns on wooden boxes and this takes time but there are some basic skills that you need to learn before you start. 

Wood Relief Carving Leaf Motifs

It's important to use the right tools for the job, so learn which tools are used to accomplish which particular task and practice using them.

Use soft woods like Basswood, because they're easy to carve. This will allow you to learn the basic techniques of wood carving without having to wrestle with a hard wood that's tough to carve.

Polmac (UK) Ltd traditionally uses Linden and Alder which are woods that are soft enough to carve easily and are also ideal for wood staining purposes.

Polmac (UK) Ltd Decorated Boxes

Most importantly, ensure your wood carving tools are always sharp, because then you can cut cleanly and evenly into the wood.

If you take care, it's even possible to cut across the grain. However, remember that it's always better to carve with the grain, rather than against it!

Tip: To prevent the grain from tearing away, cut in from both sides.

Sharp hand carving tools are also safer to use than blunt ones, because with blunt tools you'll invariable need to use more pressure. Accidents can then happen, because by using more pressure, your tools may slip and slide.

It's also important to learn more about the wood itself, particularly the characteristics of the end grain and how it can help or hinder you.

Be ambitious and use your own designs. They don't have to be complicated but it will give you a great sense of satisfaction to produce carvings that you have designed yourself. If this doesn't come easily, don't worry, because the more you practice, the better you'll become.

Start with simple designs, that you know you can easily accomplish and build on that to produce more intricate designs.

You can also experiment with  different kinds of carving to find which ones you really like, such as chip and  relief carving, caricatures, realistic sculpture, wildfowl etc

Wood carving can be immensely enjoyable, so be patient, learn the basics, try out different types of carving and above all have fun!

Monday, 29 February 2016

To Wipe Or Not To Wipe Wood Stains - That's The Question!

When applying wood stains, the golden rule for getting the very best results is to apply a wet coat, then wipe off the excess before it dries.

It's quicker and more efficient to apply the stain with a cloth, or sponge than to use a brush, especially if you're using a fast drying wood stain on a large surface. You're also less likely to have problems with the colour application.

Applying Woodstain Using A Sponge

However, it may be easier (and cleaner) using a brush to get the wood stain into tight corners. You can still use a cloth or a sponge but they must be soaked with the stain. If they're too dry it won't work!

There's nothing wrong with using a brush but stains, including water-based, lacquer and dye stains, dry too quickly to allow time to brush on and wipe off large surfaces before the stain begins to dry.

You can use virtually anything to apply the stain, including a cloth, sponge, paint pad, roller and even a spray gun. However, if you use a spray gun you'll need to clean it afterwards and this tends to be a long, laborious process. 

The most important point to remember is that you must wipe off all the excess stain before it dries.

If the stain begins to dry before you can wipe it off, you'll get unsightly blotching caused by thick dry spots of stain next to still wet areas.

If you're brushing on one of the fast drying wood stains, you may also get darker lap marks that are caused by brushing more wood stain over dried stain areas.

Tip: If you find some dried patches of wood stain, quickly apply more stain to dissolve and even out the dried patches!

If you're applying wood stain, be sure to take the advice above, if you want to achieve a first class finish! 

Thursday, 25 February 2016

How To Prepare Wood For A Top Quality Finish!

Wood preparation, prior to staining, should always be thorough so as to achieve a top quality finish. There are a number of factors that will determine the final outcome, including the type and quality of the wood and the curing method, which ensures optimum water content.

After cutting and planing, the next important task is to ensure that all surfaces of the wood are properly prepared ready for assembly and the application of the wood finish, whether this is a wood stain, clear lacquer, or a block colour paint..

Polmac (UK) Ltd Craftsman Using A Mechanical Sanding Wheel

Sandpaper or glass paper, as it is sometimes called, comprises sheets of paper or cloth with an abrasive material glued to one surface. However, neither sand nor glass is now used in the manufacture of sandpaper, as they have been replaced by safer and more durable, modern abrasives.

Sanding a rough surface smooth for a wood finish may seem simple enough but different woodworking experts have different opinions about how best to achieve this, in the most efficient way.

All surfaces of the wood should be sanded evenly, working through the sanding grits from course to fine. Course sanding paper is used to eliminate tool marks and flatten large surfaces. 

Then each successive sandpaper grade, from medium to fine can be used to eliminate the scratches left by the previous sanding.

On flat surfaces, sandpaper should be backed by a sanding block. These are usually made from cork, or you can use a ready made, disposable sanding block made with the sandpaper glued to rigid foam, if you prefer. 

During sanding, it's important to sight along the wood surface to ensure an even sheen with no scratches left from the previous grit. You can then move on to the next grit.

When sanding manually, you should use light even pressure, because too much pressure will mark the wood unnecessarily. The weight of your hand, combined with even strokes should be perfectly adequate.

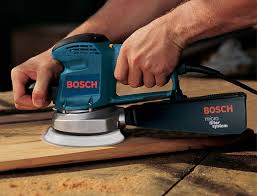
If you decide to use a power sander, a random-orbit sander, rather than a belt or vibrating sander is best, as they rarely leave noticeable scratch patterns.

Random Orbit Sander

When using a power sander, the weight of the sander will provide sufficient pressure to give you the smooth, even finish you're looking for!

Be sure to take the above wood preparation advice seriously, if you want a top quality wood finish! 

Monday, 22 February 2016

Are Finishes For Wooden Boxes Food Safe?

In today's food safety conscious society, particularly after the recent foot and mouth and horse meat scares, it's crucial that wood finishes, particularly those that are in contact with food and children are safe.

Babies and small children are particularly vulnerable, as they have a tendency to explore the world through their mouths.

Wood Stain Application

Water based paints such as emulsion and also wood stains are probably less likely to contain harmful compounds, such as solvents, pesticides and herbicides, than say gloss paint, or lacquer finishes.

But paints and lacquers can flake off, especially on porous surfaces so it's important that they're as stable as possible.

If wood is to be in contact with food the safest option is to leave the surface unfinished.

Wood packaging products such as food hamper boxes, cheese boards and cheese safes are usually made from a hard, robust wood like Beech, that is finely sanded for ease of cleaning and left 'raw' for complete 100 % food safety protection.

Harrods 'Fromagerie' Cheese Safe & Cheese Board 
(Made from natural unfinished Beech)

However, unfinished wood tends to get grubby very quickly, so the surface can be finished with an edible oil to draw out the natural warmth and beauty of the wood and to protect it from finger marks.

Manufacturing wood presentation boxes means that Polmac (UK) Ltd sources a large amount of wood, mostly Linden and Alder, although other woods are also used.

We never use wood from timber suppliers where it may contain harmful additives such as preservatives. All Polmac wood is obtained from sustainable and managed sources, as rough hewn planks, straight from a  reputable, local saw mill. In this way, we can guarantee the quality of our customized, wood packaging products.

There are few wood finishes that every person agrees are completely food safe. However, some people regard all wood finishes as potentially harmful, mainly because manufacturers label their wood products as being food-safe, which implies that other finishes are not!

Therefore, a lot of energy may be expended arguing about food safety issues where in fact none really exists.

However, to be absolutely certain that wood finishes are completely food safe, they must also be properly cured. As a rule of thumb, it takes about 30 days for wood finishes to cure properly

Polmac (UK) Ltd uses branded lacquer and paint finishes that are certified as being food safe, unless otherwise specified.

However, if you're still concerned, or unsure about the food compatibility of wood finishes, then our advice is avoid using any type of wood finish altogether.

Monday, 15 February 2016

Corporate Gifts - An Important Marketing Strategy!

Giving gifts to clients is a serious business. It can establish and / or reinforce important relationships, if part of a well considered marketing strategy. It can therefore be an inexpensive and effective way of promoting a business in the long and short term.

Business gifts are offered mainly to major and prospective clients, usually as a thank you for their business. This affirms the relationship with the client and enhances the personal connection between both parties.

Polmac (UK) Ltd Round Hamper Boxes

Gifts to clients are given usually without any explicit preconditions but there's always a bottom-line benefit to the company that provides the gift. This is because psychologically, people will always want to reciprocate, if presented with a gift. That's why for many companies, it's an essential part of their marketing strategy.

To get the most out of a gift giving program, a little finesse goes a long way. For example, it's important that the gift is good quality and well presented. Good quality wrapping paper, coloured ribbons and a hand written note tells the client you've made an effort and this will be appreciated.

Timing is also important. The giving of gifts is best done on special occasions such as anniversaries and at Christmas when gift giving is considered traditional.

Customized gifts keep the company's name in the minds of clients, so it's a good idea to have the company logo printed somewhere on the gift.

Items such as calendars, coffee mugs and pens are used every day, so this provides free advertising for the company, on an on-going basis. However, it's important to avoid blatant self-promotion as this may defeat the object.

Polmac (UK) Ltd are specialist suppliers of customized, wood gift boxes, hampers and hamper boxes. These can be supplied as traditional rectilinear, or round hamper boxes with printed logos. They're beautifully made, versatile and terrific value, which means they will be highly prized by clients, so will help generate repeat business.

Tuesday, 2 February 2016

Small Wooden Boxes - A Delicate Balance Between Function & Design

People, through the ages have always been intrigued by small wooden boxes because they provide pleasure for both the craftsman and the owner. Whenever, they see a small wooden box, they seem unable to resist picking it up, feeling the sensuous quality of the wood and opening the lid to see what's inside.

Polmac Perfume Boxes

Over the centuries craftsmen have experimented and developed many techniques to make wooden boxes as appealing as possible. So, a large variety of woods have been used and unusual shapes and designs, lid types, decorations, finishes, hinges and fasteners have been developed.

In the commercial world, the challenge is always to create wood presentation boxes that are not only functional but also look good, so they're visually appealing and therefore as marketable as possible. These two qualities usually go together.

Owners enjoy the visual and tactile appeal of wooden boxes, sensations that are evident whenever the box is opened. They react emotionally to the size and scale of a wooden box. Generally, the smaller the box the greater the emotional charge.

In order to preserve the visual and functional appeal of small wooden boxes, consideration has to be given to the ironmongery that's used. This means that the kind of hinges and fasteners and the method of fixing must be carefully considered, so as to maintain that delicate balance between function and design.

Attaching A Metal Fastener With Steel Pins

Polmac (UK) Ltd therefore uses concealed metal hinges that are fixed at the back of the box in a specially formed v-groove feature that serves as a 'stop' to restrain the lid in an upright (90 degree) position, when opened.

We have a wide range of metal fasteners that are designed to suit every situation. Generally, fasteners are polished brass, or zinc plated with a plain or decorated finish, depending upon the clients' preferences.

However, special finishes can also be supplied including solid brass, bronze and black plated fasteners (subject to availability). Non-standard fixings such as magnetic fasteners are popular because they maintain the clean visual lines of the box.

Fasteners for small boxes tend to be small in order to preserve the visual quality and scale of the box and they're normally fixed with four steel pins, hammered home at a slight angle to maintain a solid fixing throughout the life of the box.